These easy pajama pants can be whipped up in about an hour once you get the hang of it. Instead of a pattern, you’ll use a pair of pajama pants you already own. Let’s jump in on how to sew pajama pants without a pattern (I jumped in and finally made a video too!)
This is a great beginner’s sewing project. Pajama pants are very forgiving since they aren’t fitted. I feel the hardest part is the elastic waistband, but even that isn’t terribly hard. I just prefer to have the person they are for around so I can ensure they tell me it’s a comfy length.
Our Christmas Traditions
Around the holidays we have a couple of traditions for our family. Each December 1st, we begin using our little wooden advent calendar. Since it’s been in storage, we have bought Lego advent calendars the past few years. Each day for 25 days they get to open one of the pieces to build a fun toy.
On the night of December 5, the girls set out their shoes in anticipation of Saint Nikolaus. He brings little oranges and peanuts to place in the children’s shoes. This is one we’ve brought back with us since living in Germany.
Another fun thing our family does is an advent bible study beginning on Advent Sunday. This has looked a little different each year due to the girls’s ages. One year we bought coloring books and read bible verses each day, another year we did the Jesus Storybook bible ornaments & read verses. This year we’re using Not Consumed’s Mercies at the Manager & their Christmas Countdown Cards (Here’s a $5 off coupon through my referral link!)
This year, on December 13, I’m also wrapping up 12 of our Christmas books. The girls will be able to open one per day, ending with The Night Before Christmas on Christmas Eve. These get packed away with our Christmas decorations so they’re exciting for the girls to open!
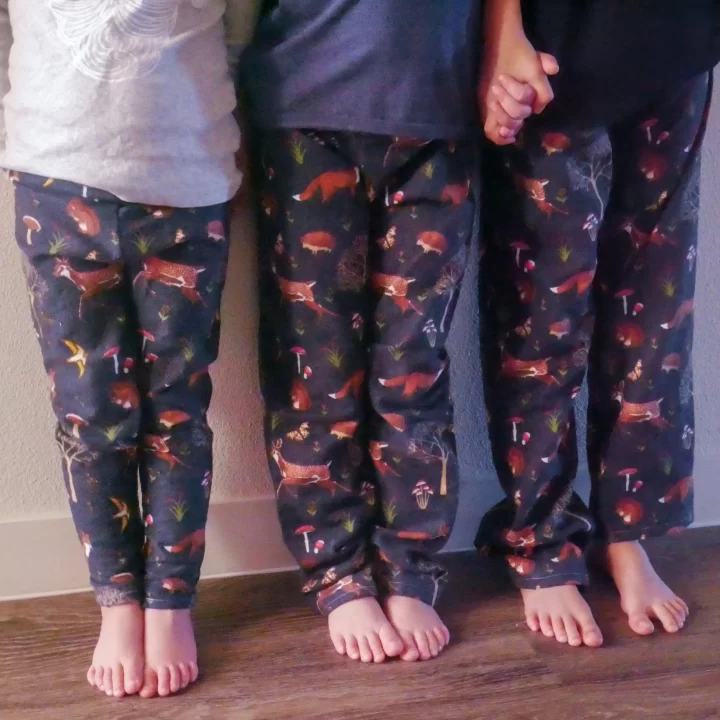
Our last Christmas Tradition rounds off on Christmas Eve. We play games, watch Christmas movies, read The Night Before Christmas, and open 1 present which contains a new pair of pajama pants. This year I’m sewing our Christmas Eve pajama pants (and sharing how I do it with ya’ll!)
How to Sew Pajama Pants Without a Pattern
This is a fairly simple way. As I mentioned before, PJ pants are super forgiving to make. Since it’s mostly straight lines of sewing, it’s also a great one for beginners! When I took Home Economics in High School, I felt so proud of my pajama pants I made. I hope you are able to find the same satisfaction too.
I let our 4 year old try hers on and she kept saying “they’re so cozy!” But a word of caution, if your children have more fitted PJ pants, give yourself an extra inch and a half to two inches to ensure they aren’t too tight at the ankles!
To make pajama pants without a pattern, you’ll need:
- a pair of sweat pants or pajamas
- ½-2 yards of fabric (depending on if it’s for toddlers, kids, or adults)
- tissue paper, newspaper, or paper bags (to trace your pattern on)
- sharp scissors (I used pinking scissors, I’ll share why below)
- a sewing machine
- matching tread
- ½ inch, non twist elastic
- pins
Pair of Pajamas
As I mentioned before, a more loose fit pair of pants will help ensure you have enough room. If you only have more fitted pairs, add 1.5-2 inches on each side of your pattern for the leg sections.
Fabric
Make sure to wash, dry, and iron your fabric before making your pajama pants. I personally used flannel because I wanted to make cozy pants for winter nights.
Paper
You can use whatever paper you have on hand. I used newspaper from our mail that I taped together. You could do the same by cutting apart paper bags and taping them together.
Sharp Scissors
If you use regular scissors, you’ll need to use a serger or go back over your seams with a zig zag stitch. I used pinking shears which cut a zig zag pattern into the fabric to help decrease fraying. I also went back over the butt and crotch seams with a zig zag stitch to enforce them.
extra help for sewing the front and back portions
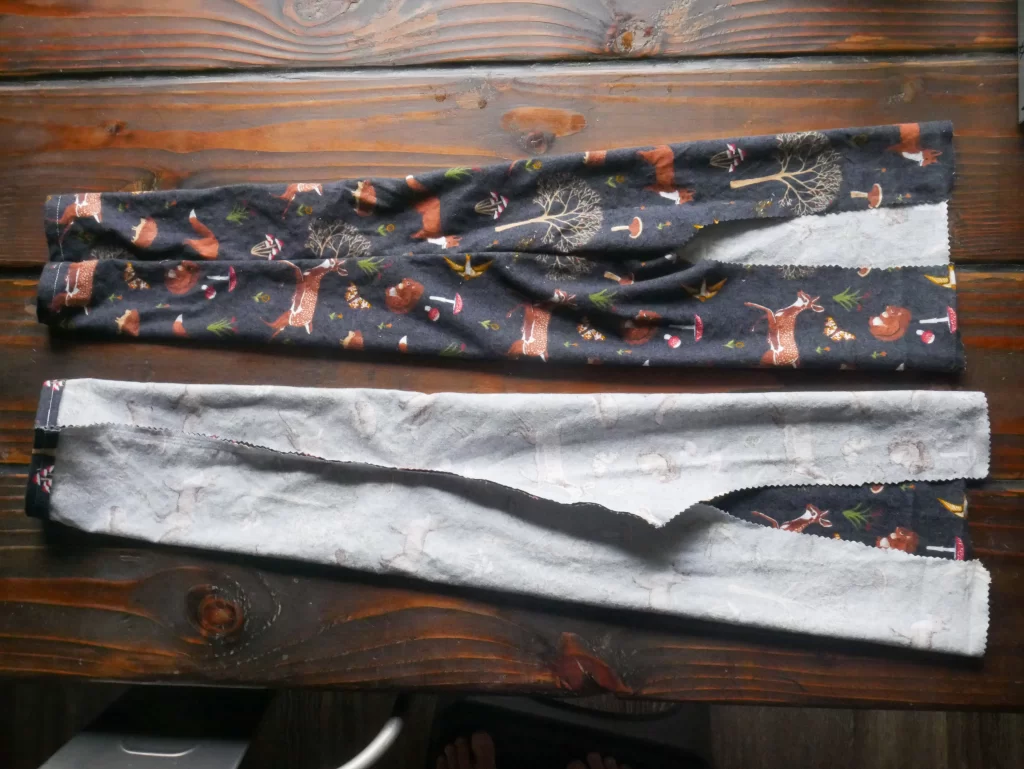
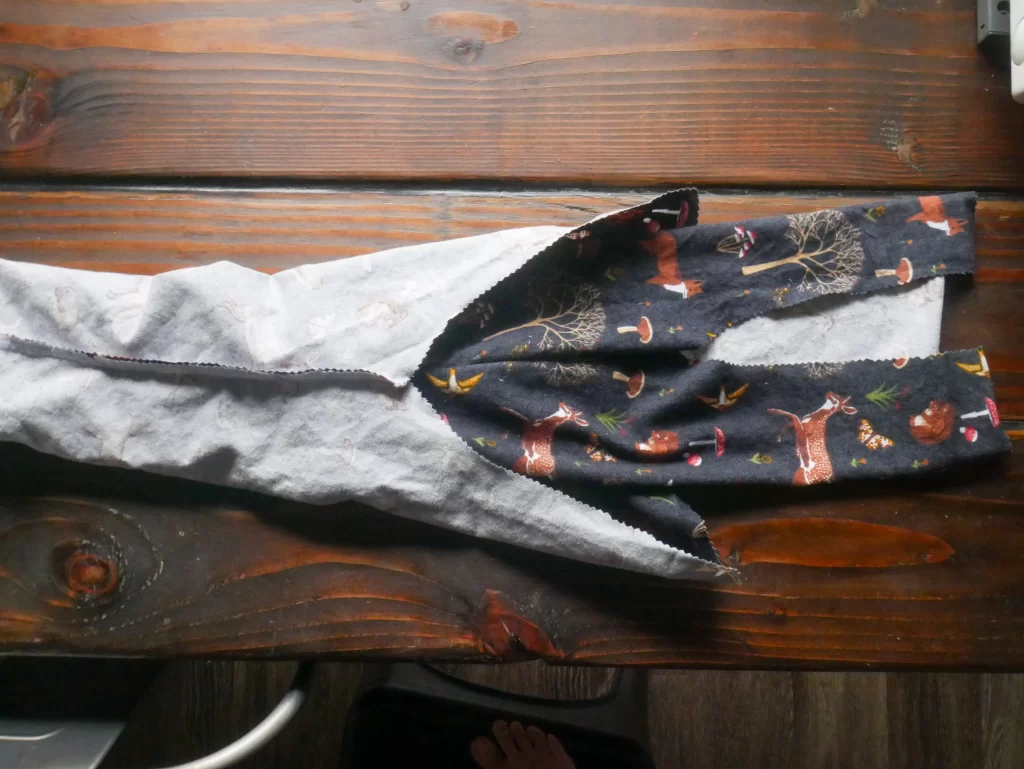
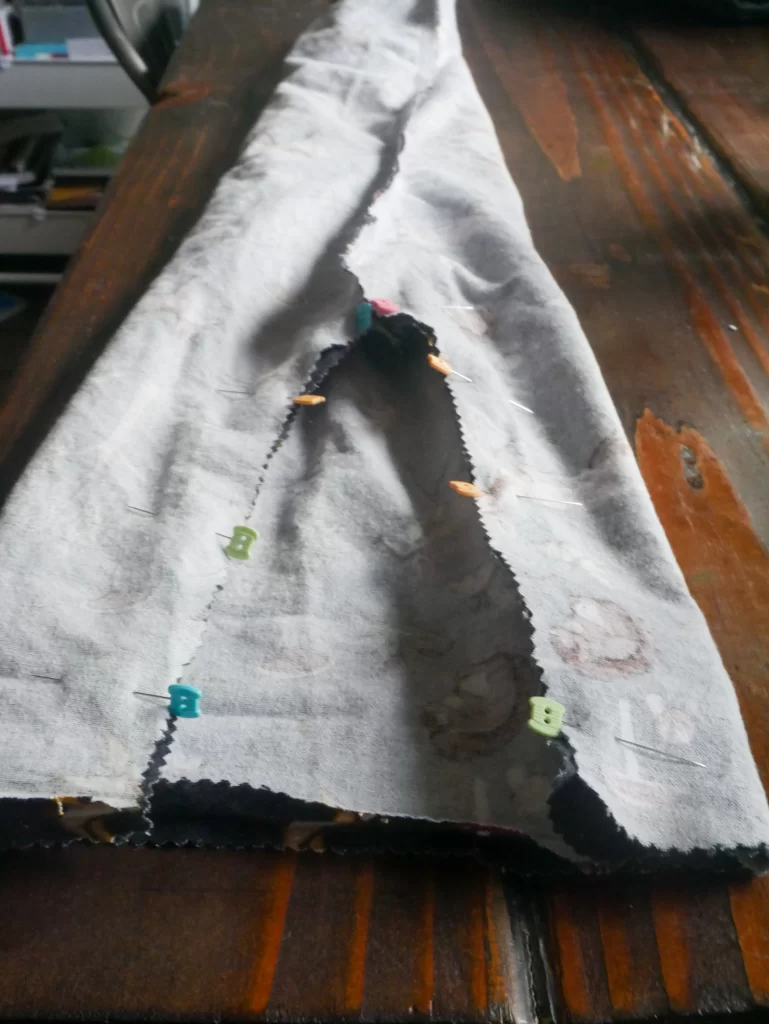
Once both of your leg sections are sewer up, you’ll want to pull only one pant leg right side out while keeping the other inside out. Then you place the right side out pant leg into the inside out pant leg like so:
don’t forget to “pin” this for later!
How to Sew Pajama Pants Without a Pattern
These pajama pants are easy to make and don't require a pattern. Feel the satisfaction of making your family's own cozy, pajama pants!
Materials
- ½-2 yards fabric (washed, dried, and ironed)
- paper to trace pattern
- ½ inch non-twist elastic
- pair of sweat pants or pajama pants
Tools
- sharp scissors (or pinking shears)
- matching thread
- sewing machine
- iron
- pins
Instructions
- Tape together your paper so that it's longer than your pants.
- Fold your pants in half and pull out the butt seam so that it forms a point and will lay flat.
- Line up the straight side of your pant on the straight side of your paper.
- Make a mark at the foot and top of your pants. Then measure 2.5 in (6.35 cm) from those marks. Now, draw an even line at the 2.5 in mark at the foot and top of the pants.
- Make marks 1 in (2.5 cm) from the leg parts of your pants up the entire side.
- Using a ruler, connect your marks up until you reach the part of your pants that curves. Here, you'll hand draw for your pattern.
- Now you'll take your ruler and draw a straight line up the front of the pants to your line that's 2.5 in from the top of your pants. This line will be 1 inch from your pants at the bottom, but further from the top due to your pants having elastic in the waist.
- Your pattern is done, so now you can cut it out.
- Fold your fabric so you have one fold between 2 layers. Now you will double this fold so you have 2 folds between 4 layers. The 2 folds need to be lined up so you can pin your pattern to it. (This will also allow you to only have to cut once but make your 2 pieces.) see video
- Pin your pattern down so the straight part lines up with your 2 folds.
- Cut your fabric out around your pattern so you have 2 pieces. (if you're using pinking shears, cut the pattern out with them.)
- Separate the two pieces of fabric. Fold the ankle portion ¼ in (0.6 cm) and iron. Then fold another 0.5 in (1.3 cm) and iron. Fold a final 0.5 in and iron. This will be your ankle hem. Repeat on your second piece of fabric.
- Fold the waist portion ¼ in and iron. Fold another 1 in (2.5 cm) and iron. Fold for a second 1 in and iron. Unfold all 3 folds. This will leave lines so you can sew up your pants, but have lines for when we fold down the waist line.
- Fold ankle hem over once ½ inch and iron. Fold over ½ in again and iron down. This keeps your raw edge "folded up" in your hem.
- Using a straight stitch, sew your ankle hem, using a locking stitch at the beginning and end. Repeat on second piece of fabric.
- Taking one piece of fabric, place the right sides together so the raw edges line up on the leg portion of your pants. Pin 2 raw sides. Repeat on second piece.
- If you have a serger, you'll use it here to sew only the leg portion of your pants. If not, sew ¼-½ in from the raw edge, starting at the ankle hem & going straight up until you reach the curve. Use a locking stitch. Do not sew up the curved portion yet. Repeat on second pant leg leaving the buttocks portion open again.
- Keep 1 pant leg with wrong side out. Turn 2nd pant leg so the right side is out.
- Place right side out pant leg inside your wrong side out pant leg.
- Pair up and pin your raw edges. They will be perpendicular (90*) with your leg seams.
- Sew the raw edges together. They will form a U shape (this will create the front and back seams.) As you sew the groin portion, back stitch to reinforce this seam. Go back over with a zig zag stitch to strengthen the front and seat of your pant.
- Pull your pant leg out. (Now they look like pants!) Keep pants inside out.
- Refold your waist folds you ironed earlier. You may want to re-iron them now.
- Take 2 pins to mark a 2.5 in opening at either the front or back seam (this will allow you to put your elastic in laster).
- Using a straight stitch and starting at one pin, sew the entire circumference of the waist until you reach your second pin, leaving an opening.
- Using the elastic, wrap it around the waist of whomever's pants these will be so that it's comfortable. Mark that spot. Measure BACK 1 in (so subtract 1 in from the mark) and cut.
- Place a safety pin on 1 end of your elastic and push elastic through the waist fold you have created.
- When both ends of elastic are out, overlap them ½ inch and sew using a zig zag stitch.
- Sew closed your waist using a straight stitch.
- Congrats! You're done. Enjoy your new, cozy pajama pants.

Leave a Reply